Since I could never find a good Christmas finger play that talked about Jesus' birthday I made one up myself! I hope you like it and can use it with your preschoolers. My preschoolers love it and want to do it over and over, they love taking turns saying the different parts. It is also a great lesson in placement as you can have the children stand in different places depending which line they are going to say. It helps them learn 1st, 2nd, 3rd, etc.
5 Little Christmas Trees
5 little Christmas trees standing by the gate
The first one said, "It's getting late".
The second one said, "There are angels in the air".
The third one said, "Why are they there?"
The fourth one said, "It's Christmas day"
The fifth one said, "They tell of Jesus' birthday!"
Then along came the shepherds and the three wise men,
and they all bowed down and said "We love him".
Hope you enjoy. Have a very Merry Christmas!
Friday, December 5, 2014
Sunday, November 16, 2014
Autumn - Lots of Autumn Leaf Activities
The leaves are changing colors and it's time for my preschoolers to make some colorful leaves. There are so many fun crafts to do for this season. Here are a couple we did last week.
PAPER TOWEL FOOD COLORING EYE DROPPER LEAVES:
 You'll need paper towels, plastic eye droppers, water and food coloring.
 I cut paper towels into leaf shapes. Then I put them down for the kids on stack of newspaper (want a thick stack so the food coloring doesn't go through to the table). I put red, yellow, and orange (mixed one drop of red with a few drops of yellow) food coloring in small bowls with some water.

Then I let the kids have fun taking color from the bowls and dropping it onto the paper towel leaves.
The kids learned fast how much they wanted to squeeze out. They loved watching the color spread after it hit the paper towel.
 By adding each color wonderful autumn leaves were made.
 In order to keep track of which child created which leaves, I put them to dry on a light colored piece of construction paper that had their name on it. I forgot to take a picture, but after the towels - oops, I mean leaves - dried, they left a neat pattern on the paper. Many of the children wanted to take that paper home as well.
Another craft we did was LEAF RUBBINGS:
You just need to cut out leaf patterns from cardboard.

It is important to tape down the cardboard leaves to the table (or newspaper you might have covering the table ) so they don't move. Then place a piece of white printer paper over the cardboard leaves. Give the children fall colored crayons with the wrappers off so they can roll and rub them across the paper. They are amazed when they start to see the leaves appear. It is probably a good idea to hold the paper still for the children so they can rub and rub with out the paper flying off the table :).
Here is a finished leaf rubbing picture -

 I drew a large leaf shape on thick white paper and let the kids glue down the tissue on the paper.

They really took their time and enjoyed putting different colors all over their leaf. They used glue mixed with a little water to brush over the tissue, making it stick to the paper.

Almost done, after they dry, then I cut them out. It is good to leave the area around the leaf while the children are pasting the tissue so they can really cover and not worry about staying in the lines.


PAPER TOWEL FOOD COLORING EYE DROPPER LEAVES:
The kids learned fast how much they wanted to squeeze out. They loved watching the color spread after it hit the paper towel.
Another craft we did was LEAF RUBBINGS:
You just need to cut out leaf patterns from cardboard.
Here is a finished leaf rubbing picture -
Another fun fall leaf craft is TISSUE PAPER LEAVES:
I cut many small pieces of tissue in fall colors (red, orange, yellow, and brown). The kids could also practice their cutting skills by cutting the tissue themselves.
They really took their time and enjoyed putting different colors all over their leaf. They used glue mixed with a little water to brush over the tissue, making it stick to the paper.
Almost done, after they dry, then I cut them out. It is good to leave the area around the leaf while the children are pasting the tissue so they can really cover and not worry about staying in the lines.
Once dry I cut out on the leaf outline to create the beautiful fall colored leaves you see in the picture below.
Father's Day
Well I'm finally getting around to posting for Father's Day. But maybe it will inspire you for next year or if you have a child who would like to make a gift for their father's birthday?
First I took a man's shoe and painted the bottom. I put it onto regular white contsruction paper. Then after it dried, I painted the child's foot blue and they stepped onto the man's shoe outline.
 I added the words "I'm following in your footsteps" to the top and then Happy Father's Day 2014 was written on the bottom. I trimmed the paper and glued it onto a thick scrap book paper that each child picked out for their dad. This is going to become the front of the father's day booklet, so I am leaving room on the left to staple it.
 On another piece of plain white paper I did a print of their foot in blue again. When it dried I cut it out and glued it to the back of the thick scrapbook paper. I also typed up the following poem I found online and printed, cut, and glued that onto the page as well.
My footprint is small, but getting bigger everyday
I am learning how to be big by watching you work, love and play.
Remember when your days are long and you can't walk another mile
That this little footprint makes it all worthwhile.
 The second page was a Dad survey that I also found online. Each child answered the questions and I filled it in for them. We glued that sheet down to another heavy scrapbook paper.
 Once all done the 2 pages were stapled together to make a wonderful booklet for dad!


First I took a man's shoe and painted the bottom. I put it onto regular white contsruction paper. Then after it dried, I painted the child's foot blue and they stepped onto the man's shoe outline.
My footprint is small, but getting bigger everyday
I am learning how to be big by watching you work, love and play.
Remember when your days are long and you can't walk another mile
That this little footprint makes it all worthwhile.
Sunday, August 24, 2014
Easy Dalmatian Dog Art Activity
When we were talking about pets we made a very easy craft that everyone loved. First I cut strips of heavy white paper (it can be posterboard, but doesn't have to be) and I also cut out long dog ear shapes from the same type of paper. Each child put their finger in a black stamp pad and put finger prints all over the strip and the ears to look like dalmatian dog spots. Then I stapled the strip to fit their head, stapled the ears on each side...

...instant dalmatian puppy dog!

Dinosaurs Art Activities
The kids always enjoy when we learn about dinosaurs. We read some books that told about different dinosaurs, and we also read books that were just cute stories with dinosaurs as the main characters. Jane Yolen has a fun series of books about how dinosuars go to bed, eat, go to school, etc. I also have a flannel board story I do with the children. Each type of dinosaur is cut out in a different color of flannel. I have a story that tells the main characteristics of each dinosaur and their name. I pass out the flannel dinosaur pieces ahead of time and the children enjoy bringing up the piece to the board when they hear their dinosaur described.
For art I had the children use blue and green water colors to pain the sky and the grass on a piece of white paper. Then they cut out a "volcano" that I had outlined on a piece of brown paper. I like to give the preschoolers as much practice with scissors as possible. They glued the volcano piece onto the paper and then took dinosaur foam stickers and pasted them wherever they wanted on the paper. I love their creativity with their placement! See how they turned out :


Another art activity that we enjoyed during Dinosaur week was using bubble wrap to make a texture for dinosaur skin. I cut out a small piece of bubble wrap. The same piece can be used for more than one child. And I had a cut out of a dinosaur shape ready for the children. You can use any color combination for the paint and the dinosaur cutout. I used orange paper for dinosaur cutout and brown paint.


Pull the dinosaur carefully off the bubble wrap and you will have a fun design for your dinosaur skin! I can't believe it but I guess I forgot to take a picture of the final product. I do that alot! The kids are so excited about how they look and we start talking about them and I put them in the sun to dry and go on talking about something else with them or having the next child come over to do theirs. That is why I'm not very good at this blogging thing! I'm too involved in the moment with the children and have to remind myself to document it to put on the blog! I'll get better with that, sorry. So for now just imagine that the dinosaur would have big bumpy circle skin all over, or better yet, go try it and see how it turns out for yourself !
We also had a fun dinosaur coloring page that was in the dot painting book, so I copied it and the kids used the dot painters to fill in their dinosaur.

Mother's Day
SONG:
I taught the children an easy song that they memorized and all sang to their mothers when they came to pick them up the last school day before Mother's Day. It is sung to the tune of "You are my Sunshine":
Mother's Day Song
You are my mommy
my special mommy
you are the best in
every way.
And that is why I
want to wish you
A Happy Mother's Day!
ART:
We made a booklet for the moms, which served as their card and gift. I used two pieced of thick scrapbooking paper for the book pages. On the front I mounted a paper that they created a bouquet on. The "flowers" were their hand prints, and they painting the stems with a small brush and green paint. I wrote Happy Mother's Day on the front.

On the inside of the book I had each child take a survey about their mother that I found at www.
I also used the grandmother survey you can find at the same link for one of the children who has a grandmother living with them. After they finished the survey I glued it to the hard paper and stapled the booklet together. We wrapped them in flowered wrapping paper.
I also had a chance to take a picture of each child holding a bouquet (of fake flowers) in front of real flowers in my yard. I had them printed at the local drugstore with a cute frame around it that said "happy mother's day" at no additional cost. I put those pictures inside the booklet also.

Sunday, May 18, 2014
Our Lady of Fatima Feast Day
May 15th was the feast of Our Lady of Fatima this year and it fell on a preschool day for us. So I read the children the story of what happened in Fatima almost 100 years ago. We recreated the miracle of the sun with our art project you can see below:
First we painted a paper plate yellow to make the sun.

After it dried I cut around the edges to make points for a bright shining sun.

We wanted to recreate how the sun turned different colors during the miracle of the sun. We covered a pre-cut circle of cardboard with foil. Then the children painted the foil with a mixture of half glue and half water. Once the foil was covered, they place cut pieces of colored tissue paper all over the circle, painting over the tissue with the glue mixture to make it stick.

The finished product was a beautiful, shiny circle of color! The kids really enjoyed picking out colors and painting over them.


Once the two pieces were held together with the brad (not too tight), the colorful circle could spin and spin, as the colorful sun moved around the sky during the miracle of the sun.

ZOO ANIMALS
We are exploring the fun of animals for the next few weeks and this week we talked about Zoo animals.
BOOKS:
The Zoo that Moved (true story about the Los Angeles Zoo moving) - by Gloria D. Miklowitz and Don Madden
Goodnight Gorilla - by Peggy Rathmann
Barney Goes to the Zoo - by Linda Cress Dowdy and Karen Malzeke-McDonald
Hop- Skip- Jump-A-Roo Zoo - by Jane Belk Moncure
ART:
We created lions with fork painting. I didn't get pictures of the beginning of the process, but you can imagine. We took a bowl and put it upside down on the yellow paper. I helped to hold the bowl down as the children traced around it with an orange marker. The I had them draw a small upside down triangle in the middle of the circle (to make the nose), two half circle lines out form the triangle (to make the mouth), and two larger circles for eyes.

Then they dipped a plastic fork in a shallow bowl of orange paint, making sure to press the fork down flat to get the bottom of the fork filled with paint. Then they took the fork to the paper and pressed down and pulled to make the "hair" of the lion's mane.

They continued the fork painting all around the face of the lion creating a beautiful mane and cute lion!

TABLE TOYS:
I put playdough out with popsicle sticks (long and short sizes), and animal shape cookie cutters. The kids loved cutting out animals and putting them in "cages" they had made from the popsicle sticks stuck in playdough. Some of them just used the cookie cutters as animals for their cages, as seen in the picture below. They enjoyed their playdough zoos.

Sunday, May 4, 2014
Transportation
Transportation is our theme for a couple weeks. We talked about the basics - cars, trains, airplanes, helicopters, bikes, skateboards, etc. and some of the kids suggested things like parachutes and roller skates as well. So many things to explore with this topic.
BOOKS:
Fred and Ted's Road Trip by Peter Eastman
Clink Clank Clunk! by Miriam Aroner The Big Book of Things That Go by Dorling Kindersley Limited
Red Light, Green Light by Margaret Wise Brown
Jets by Carrie A. Braulick.
Helicopters by Jeffrey ZuehlkeART:
Painting With Cars
When we read the funny book Fred and Ted's Road Trip by Peter Eastman, one of the character's in the book drives his car through a mud puddle. This was perfect for us to lead right into our art project. I filled up a plate with brown paint and we pretended it was a mud puddle. I supplied the kids different types of toy cars that had different types of wheels on them (some smooth, some with bumps, etc.) so that they could get a different pattern depending which one they used. I gave them some light green card stock (good to have heavy paper to allow for them to "drive" a lot without ripping the paper), and let them drive around.


Paper Airplanes
I didn't take any pictures of these as it was too hard for me to take a picture of each fold I made as I was making them. Once the kids started playing with them outside we were having so much fun I forgot to take any pictures and then they took them home! Sorry. For this project I again used heavy cardstock so the planes would hold up well when we flew them outside. The kids decorated them with stickers, markers, and crayons however they wanted (we folded the paper together first - I folded and they pressed it down flat and straight).
I used the book Paper airplanes. Flight school level 1 by Christopher L. Harbo. It has instructions and photo-illustrated diagrams for making a variety of paper airplanes.
Sunday, April 27, 2014
Rain and Weather
This week we talked about Rain and Weather. We were lucky that it actually rained one day to remind us about this type of weather that we don't get very often in our area.
BOOKS:
For our circle time we had some good books about weather:
The Wind Blew by Pat Hutchins
Rain Drop Splash by Alvin Tresselt
Noah's Ark illustrated by Peter Spier.
Like A Windy Day by Frank Asch and Devin Asch
Where does the Butterfly Go When It Rains? by Alvin Tresselt
ART:
Rainbows:
We made rainbows out of paper plates, ripped paper, and cotton balls. You need glue, hole punch, and yarn or a pipe cleaner to put it all together. Because the kids I have are younger in age (3 and 4) I ripped up the paper ahead of time. But for older 4 year olds and 5 year olds, let them rip the paper themselves. Great help for their small motor skills that will help with writing. I also precut the paper plates to look like a rainbow with a cloud on each end, and drew a line for each color so they knew where to put the different colored paper.

The kids dotted the glue around the area for each color and then laid down the ripped paper in a line. This was also good for their small motor skills. I gave them a brush if they wanted to spread the glue out rather than just dot it on the plate.


After filling in all the colors they pulled apart a couple cotton balls and glued at the bottom for clouds. Once it was completed I punched a hole in the top and threaded a pipe cleaner through (the children can also do those steps on their own) so it could be hung somewhere in their home.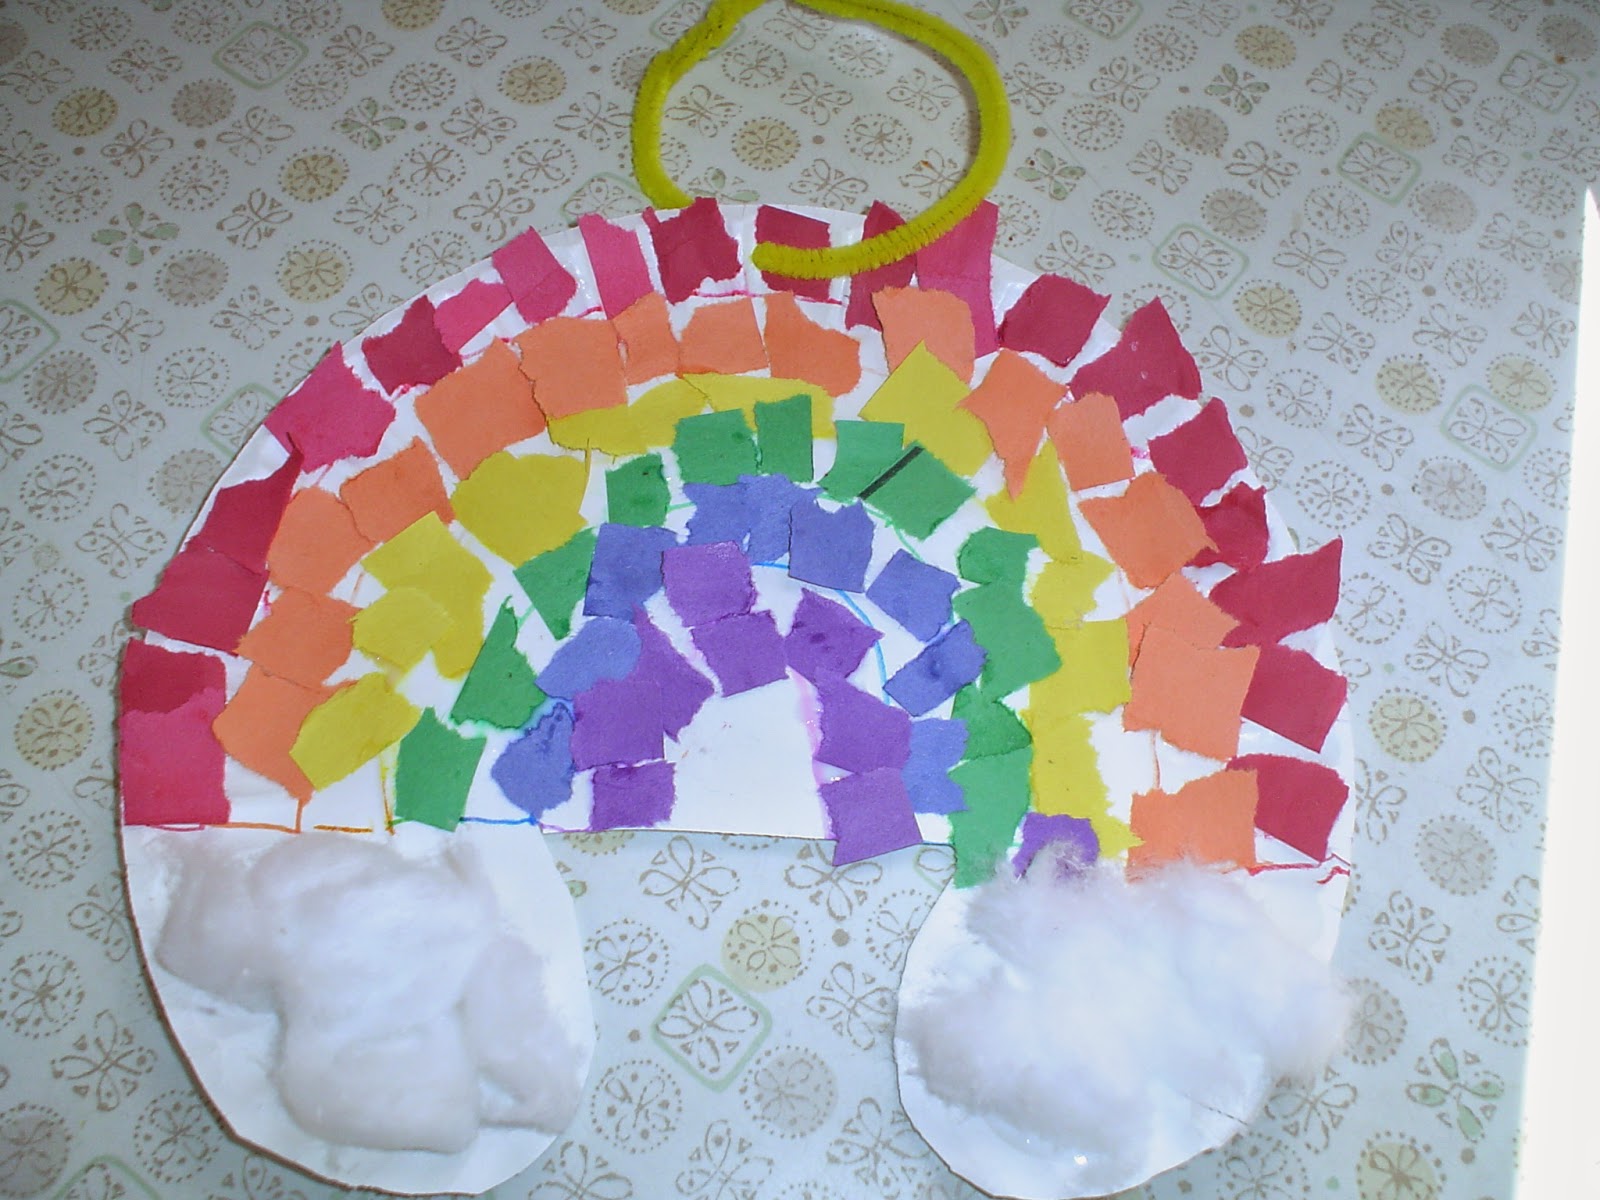

Windsocks:
I can't seem to find the pictures I took of them making these! Maybe we were having so much fun creating them that I forgot to take pictures, which I've done many times. If I do find that I just forgot to get them off my camera, I'll post them here later. But here are the instructions, hopefully it makes sense without a picture to go with it.
The children picked out a colored piece of construction paper and then decorated it with markers, crayons and stickers. These materials allowed us to turn them in to windsocks quickly and not need to wait for them to dry. We rolled the paper together lengthwise and stapled it to hold it (you can also use clear tape), then I took streamers cut into 10 inch strips and we taped them (or stapled) on to the bottom of the paper. We used a strip of construction paper (or a pipe cleaner) attached to the top to hold the windsock. After the kids were done we took them outside and watched the wind blow them so we could tell which way the wind was coming from.
Monday, April 7, 2014
SHAPES
Last week we spent a couple days doing fun things with shapes.
Books we read:
Mouse Shapes by Ellen Stoll WalshBarney's Book of Shapes by Mark Bernthal
Ape Finds Shapes by Jane Belk Moncure
Circle in the Sky by Zachary Wilson
Word Bird's Book of Shapes by Jane Belk Moncure
Art:
Marble Painting on Shapes:The kids got to pick whatever shape they wanted and we put it in the shoe box. We placed a marble in the box and topped it with whatever color water based tempura paint they wanted.


Shape Pictures:
After reading Mouse Shapes by Ellen Stoll Walsh, the kids were definitely in the mood to create something out of shapes. I gave them an assortment of shapes in different sizes and colors and let them go to it with glue sticks on white paper. As they created their pictures we talked about the shapes they were using. They used the pictures from the book Mouse Shapes to inspire them. Here is a tree, sun and fish!


Outside games:
A couple things we did outside to continue the shape theme was hula hoops (circles) and hopscotch (squares)
Subscribe to:
Posts (Atom)